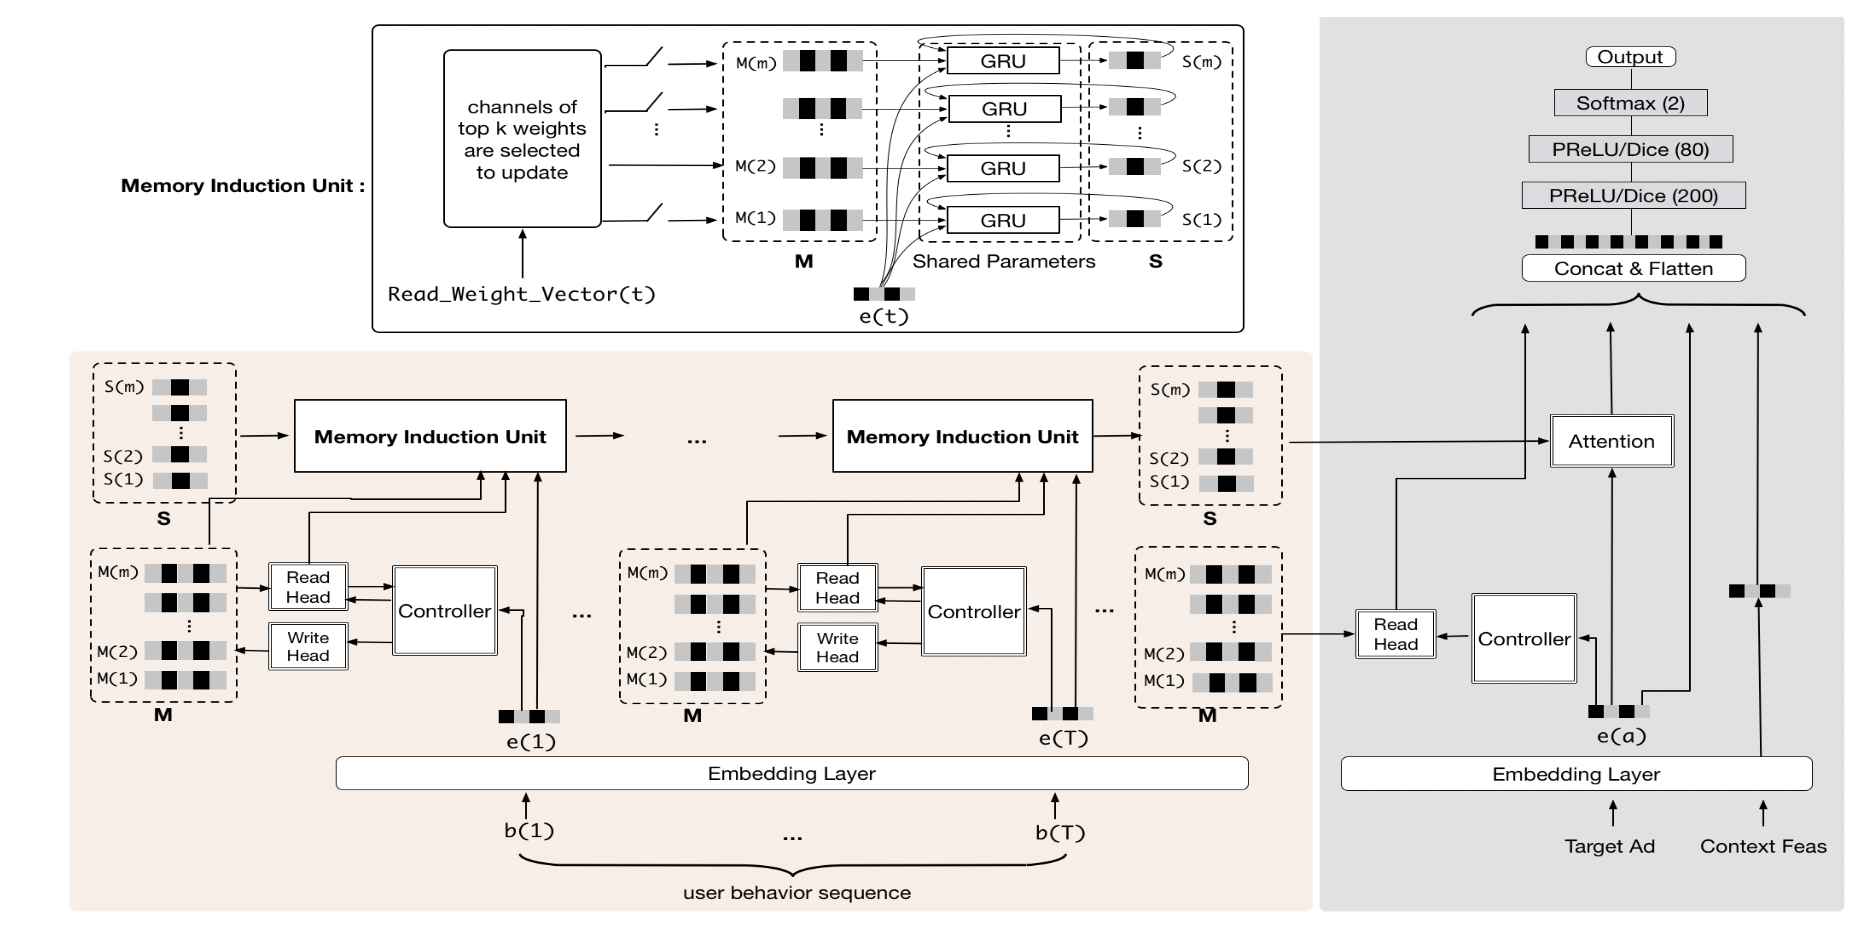
Based on the memory, every time an interaction record is generated, the multi-head memory will be written with attention, and at the same time, the multi-head memory will be read with attention (divided into erasure and addition) for training and updating parameters. After going online, the long memory will be used as a user representation.
Disadvantages: Unable to handle very long sequences, because a fixed number of memory is used, and a large amount of noise will be stored when the sequence is too long (by SIM)
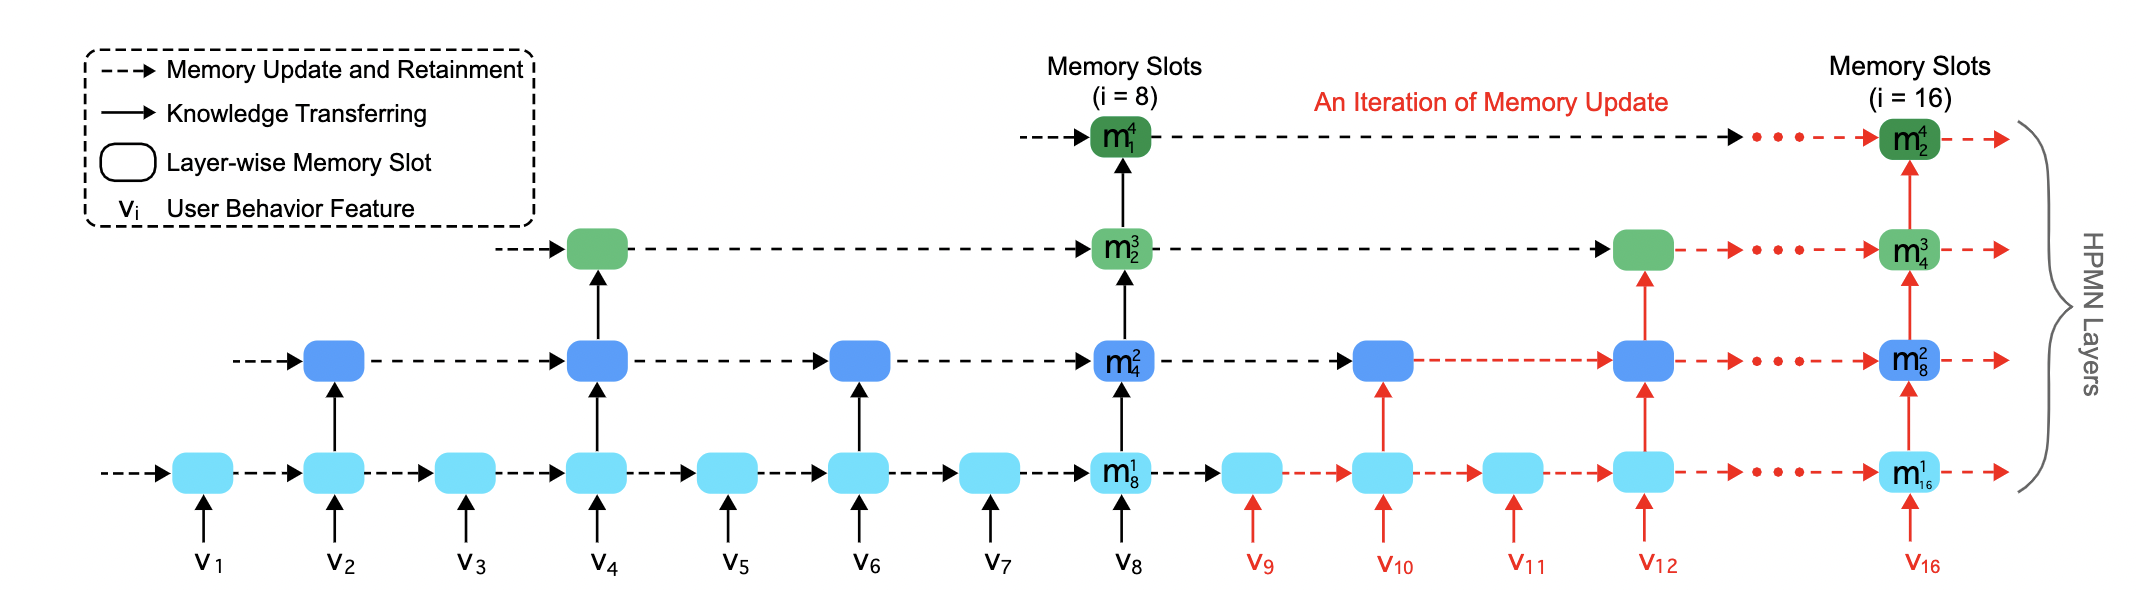
2019 HPMN Hierarchical RNN SIGIR
Use Hierachical RNN to generate multi scope memory, and read the memory in the NTM way.
Disadvantages: memory is not aimed at multiple interests, it is an abstraction of different granularities of sequences, and there is a risk of information redundancy.
2019 SIM search base method
First retrieve all interated items similar to the target item in the long sequence based on the category index (or item similarity), form a subsequence, and then treat it as a short sequence problem
Disadvantages: It is very obvious that the update of user representation and target item are not decoupled, there is no concept of Ur, and there is no possibility of incrementally updating Ur, and the performance is not as good as other decoupling methods.
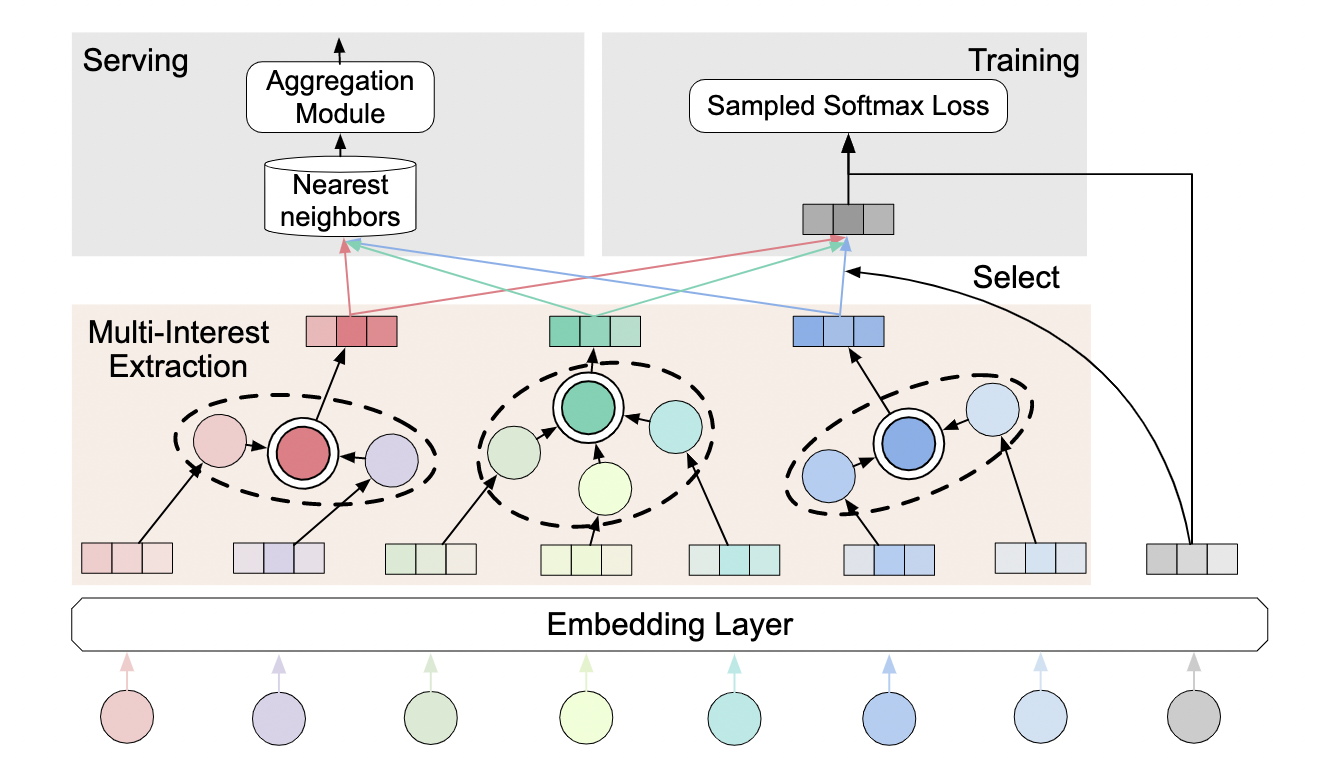
2019 MIND capsule network CIKM
Use capsule network to decouple user representation and target item
Disadvantages: New sequences cannot be fused, and new sequences need to recalculate all representations on the entire sequence
2020 ComiRec capsule network+self attention KDD
Use capsule network or self-attention model to decouple user representation and target item. Compared with MIND, some Exploitation & Exploration The Exploration of Balance
Disadvantages: New sequences cannot be fused, and new sequences need to recalculate all representations on the entire sequence
2022 LimaRec Linear Self Attention arxiv
The linear self-attention model can be used to decouple user representation and target item. At the same time, new sequences can also be integrated into user representation to realize incremental update Ur. On the premise of achieving the same purpose as MIMN and HPMN, a more expressive self-attention model is used.
method
incremental Ur update
long seq
multi interest
decouple
retrain
MIMN
yes
yes
yes(memory)
yes
full
HPMN
yes
yes
yes(multi scope)
yes
full
MIND
no
yes
yes(dr)
yes
full
SIM
no
yes
yes(sa)
no
full
ComiRec
no
yes
yes(sa,dr)
yes
full
LimaRec
yes
yes
yes(sa)
yes
full
Main Idea:
1 The premise is sequence modeling, and the main purpose is to solve the problem of time-consuming sequence model inference and large storage overhead.
2 The core is to cancel the calculation of attention by DIEN in the sequence, so that the calculation of item representation and user representation is separated.
3 The reason why multiple interests are introduced is that based on the above ideas, if only one vector is used as a user representation is too weak, and users naturally have multiple interests, it is more intuitive to use multiple vectors to represent.
Limitations:
The past work of multi-interest modeling has not solved the problem of multi-interest adaptive update (incremental update of model parameters is not considered). If you simply give a large interest number K at the beginning, most of the previous work has proved that the performance of the model will decrease when K is very large, which shows that such a crude method is not feasible. (It takes a while to input the entire sequence to retrain the model)
$ ELECTRON_MIRROR="https://npmmirror.com/mirrors/electron/" npm install--save-dev electron
在main.js文件中管理整个软件的运行:
// main.js// Modules to control application life and create native browser windowconst{app,BrowserWindow}=require('electron')constcreateWindow=()=>{// Create the browser window.constmainWindow=newBrowserWindow({width:800,height:600,})// 加载 index.htmlmainWindow.loadFile('index.html')// URL也可以//mainWindow.loadURL('http://xxxx')}// 这段程序将会在 Electron 结束初始化// 和创建浏览器窗口的时候调用// 部分 API 在 ready 事件触发后才能使用。app.whenReady().then(()=>{createWindow()})
$ npm install--save-dev @electron-forge/cli
$ npx electron-forge import
✔ Checking your system
✔ Initializing Git Repository
✔ Writing modified package.json file
✔ Installing dependencies
✔ Writing modified package.json file
✔ Fixing .gitignore
We have ATTEMPTED to convert your app to be in a format that electron-forge understands.
Thanks for using "electron-forge"!!!
$ npm run make

> my-electron-app@1.0.0 make /my-electron-app
> electron-forge make

✔ Checking your system
✔ Resolving Forge Config
We need to package your application before we can make it
✔ Preparing to Package Application for arch: x64
✔ Preparing native dependencies
✔ Packaging Application
Making for the following targets: zip
✔ Making for target: zip - On platform: darwin - For arch: x64
importtorchfromtorch.nnimportCrossEntropyLossfromtorch.optimimportSGDfromavalanche.benchmarks.classicimportPermutedMNISTfromavalanche.modelsimportSimpleMLPfromavalanche.trainingimportEWC# Config
device=torch.device("cuda:0"iftorch.cuda.is_available()else"cpu")# model
model=SimpleMLP(num_classes=10)# CL Benchmark Creation
perm_mnist=PermutedMNIST(n_experiences=5)#任务数量,对permuted数据集而言就是采用了5中不同的像素随机打乱方式
train_stream=perm_mnist.train_streamtest_stream=perm_mnist.test_stream# Prepare for training & testing
optimizer=SGD(model.parameters(),lr=0.001,momentum=0.9)criterion=CrossEntropyLoss()# Continual learning strategy
cl_strategy=EWC(model,optimizer,criterion,ewc_lambda=1,train_mb_size=32,train_epochs=2,eval_mb_size=32,device=device)#策略里面大部分参数是统一的,但也有各个策略专属的参数,例如EWC的ewc_lambda
# train and test loop over the stream of experiences
results=[]fortrain_expintrain_stream:#每次迭代运行一个task
cl_strategy.train(train_exp)#task的训练
results.append(cl_strategy.eval(test_stream))#task的评价
$ export JAVA_HOME=/Users/wangzhikai/jdk-11.0.15.jdk/Contents/Home
$ java -version
output->
java version "11.0.15" 2022-04-19 LTS
Java(TM) SE Runtime Environment 18.9 (build 11.0.15+8-LTS-149)
Java HotSpot(TM) 64-Bit Server VM 18.9 (build 11.0.15+8-LTS-149, mixed mode)
安装kafka:
$ tar-xzf kafka_2.13-3.2.0.tgz
$ cd kafka_2.13-3.2.0
启动zookeeper(kafka内置):
# Start the ZooKeeper service# Note: Soon, ZooKeeper will no longer be required by Apache Kafka.$ bin/zookeeper-server-start.sh config/zookeeper.properties
启动kafka:
# Start the Kafka broker service$ bin/kafka-server-start.sh config/server.properties
frompyflink.common.serializationimportJsonRowDeserializationSchemafrompyflink.common.typeinfoimportTypesfrompyflink.datastreamimportStreamExecutionEnvironmentfrompyflink.datastream.connectorsimportFlinkKafkaConsumerenv=StreamExecutionEnvironment.get_execution_environment()# the sql connector for kafka is used here as it's a fat jar and could avoid dependency issues
env.add_jars("file:///Users/wangzhikai/flink-sql-connector-kafka-1.15.0.jar")deserialization_schema=JsonRowDeserializationSchema.builder() \
.type_info(type_info=Types.ROW_NAMED(["a","b"],[Types.STRING(),Types.STRING()])).build()kafka_consumer=FlinkKafkaConsumer(topics='quickstart-events',deserialization_schema=deserialization_schema,properties={'bootstrap.servers':'localhost:9092','group.id':'test_group'})ds=env.add_source(kafka_consumer)
When recommending system evaluation, two groups of indicators are often encountered, one is AUC and Logloss (with negative samples), and the other is Recall, HitRate and NDCG (without negative samples, random sampling is required). These two groups of indicators often appear separately. Which group to use is related to whether there are negative samples in the data set (it has nothing to do with whether the model considers sequence, sorting model or recall model). Data sets with negative samples are often called click-through rate estimation problems. The scene of the sample is that the user passively accepts exposure, and the user selects certain items to click. At this time, the distribution of negative samples can be considered to have nothing to do with user preferences (although the model tends to push items that users like, this involves causality and bias. problem, not listed for the time being), the scene without negative samples is obtained based on the conversion of explicit data sets such as scoring or review data sets, and negative samples need to be randomly sampled.
.jupyter/jupyter_notebook_config.py and .jupyter/jupyter_notebook_config.json are two configuration files, the latter one has higher priority.
jupyter notebook password
will generate password in .json file.
If you want to use password, use the code above. If you want to use no token no password, clear the password in .json file and add jupyter_notebook_token = ""in .py file.
SSH
ssh-key is used to provide security. SSH is like a column of boxes. We can apply for one of them. At first, we will have password to login, but for more security, we can buy a pair of key (private key) and lock (public key), we send the lock on the box (We need to add it into authorized _keys) and preserve the key in our .ssh directory locally. The config file is another way to log into ssh without password, which can use the arbitrary id_rsa file (private key) for authentication.
Network
the gateway is the switcher (交换机), which always set it IP as 192.168.xxx.2. For example, the NAT mode for virtual machine in vmware: we set the vmenet8 (virtual network adapter 虚拟网卡) for the host (宿主) IP as 192.168.xxx.1, and the gateway IP as 192.168.xxx.2, and the virtual machine IP as 192.168.xxx.3-254. Then the virtual machine can reach the internet directly. And it can also be reached from internet by port forwarding on host port.
When we do research, we always need to read a lot of papers, these papers need two features:
it is related to our research topic.
it is published on famous conferences.
However, there is no such a search engine fulfilling both of two features. Google Scholar only fulfills the first feature. ACM Digital Library or dblp only fulfills the second feature. And arxiv is not even a search engine. So I want to build a web-based tool which can search the paper only in conference I am interested in.
How To Use
You can click this web-based tool link, then type in the wanted keyword to search the paper. The top 100 related paper in recent 3 years will be listed by relavance. If you want to custom the year and conference, just add them in keywords. Now it supports {wsdm, sigir, kdd, recsys, iclr, icml, nips}.
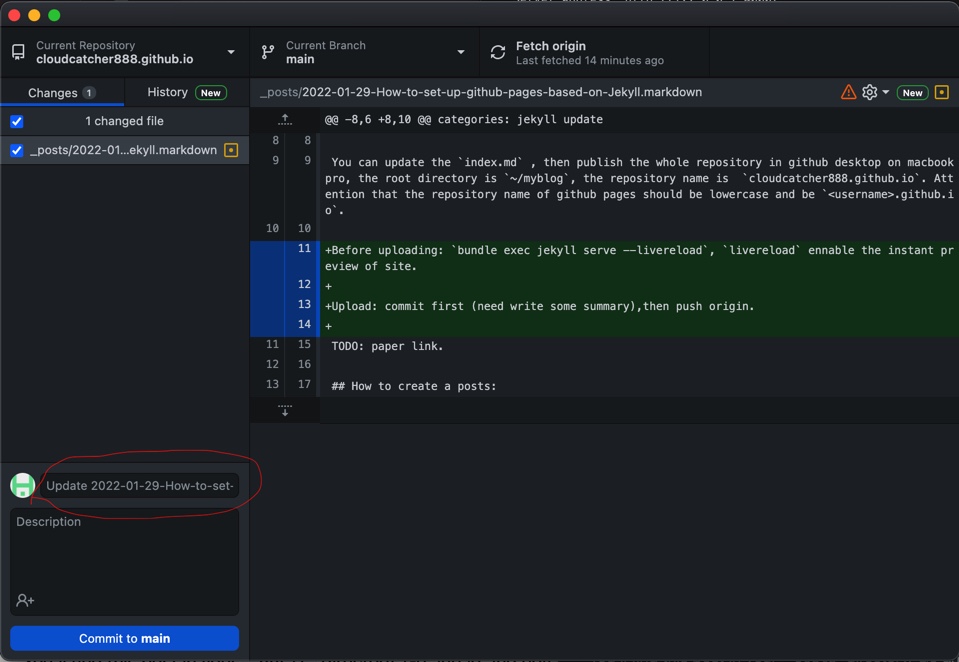
You can update the index.md , then publish the whole repository in github desktop on macbook pro, the root directory is ~/myblog, the repository name is cloudcatcher888.github.io. Attention that the repository name of github pages should be lowercase and be <username>.github.io.
Before uploading: bundle exec jekyll serve --livereload, livereload enables the instant preview of site.
Upload: commit first (need write some summary),then push origin.
Tips: pictures in post need use 
TODO: paper link.
How to create a posts:
You’ll find this post in your _posts directory. Go ahead and edit it and re-build the site to see your changes. You can rebuild the site in many different ways, but the most common way is to run jekyll serve, which launches a web server and auto-regenerates your site when a file is updated.
Jekyll requires blog post files to be named according to the following format:
YEAR-MONTH-DAY-title.MARKUP
Where YEAR is a four-digit number, MONTH and DAY are both two-digit numbers, and MARKUP is the file extension representing the format used in the file. After that, include the necessary front matter. Take a look at the source for this post to get an idea about how it works.
Jekyll also offers powerful support for code snippets:
defprint_hi(name)puts"Hi, #{name}"endprint_hi('Tom')#=> prints 'Hi, Tom' to STDOUT.
Check out the Jekyll docs for more info on how to get the most out of Jekyll. File all bugs/feature requests at Jekyll’s GitHub repo. If you have questions, you can ask them on Jekyll Talk.